Summerhouse Building Plans
Plans To Create Six-Sided Pergola - Details To Think of While Designing A Backyard Pavilion

It's much easier to finish all the lumber with a good-quality outdoor stain before you assemble the grillzebo. Next, attach the top ridge to the supports. One simple step that can really improve the aspect of your garden is building a wooden pergola. The braces will protect against the gazebo from falling over in high winds, and also add a lot of stiffness to the structure when crawling around on top later. Prices vary greatly per square foot of wall face. Pergolas (https://www.squaregazeboplans.com/oval-gazebo-plans) may be freestanding or attached to a house. You could see this in this pic. Use a saw to make the cuts to the beam, as shown in the diagram.
The top of each support has a 30 degree slope. A basic pavilion roof consists of notched 2x10 lower struts set perpendicular to the upper rafters. Although there are thinner and less costly options, the thickness of 2x lumber gives the piece massive long-term strength and durability. As you can notice in the plans you need to center the top ridge into place. The finished product will add stylish definition and shape to your yard and garden. Wrap flashing tightly around the saddle and fasten down the seam with self-tapping screws. Then look at the space around your home and decide where best to install it.
The height of each wall will depend on where you build it. Lay down the next circle of boards and fasten them (see) with screws. Using the struts as a guide, mark out the holes for the posts. Electric fan and lights for atmosphere, carpet for comfort. In a hilly environment like ours, each pier will likely be a different total length. You ought to take part in a contest for one of the most useful blogs on the net. Fit the top ridge into place and use corner brackets to lock them into place, as well. Work on a clean level surface, free of imperfections or debris.
If square, both measurements will be exactly the same. Screw it in place with 3-inch screws through predrilled holes. A hot, dry day will give you only about an hour or less of working time, so don't get sidetracked. With the top and rear garrets in place, use a reciprocating saw to cut the top of the support posts off flush with the top of the rafters. Then use the square to draw a short plumb line parallel to the others, down from this mark to the bottom edge of the board. So take matters into your own hands and design your own wooden pergola.
A self-feeding auger bit is an ideal tool for boring the half-inch-diameter bolt holes you'll need for this project. Clamp one long upper support in position on the lower supports, leaving equal overhangs on each end. Complete and stand the back and one side wall. Typically, holes for concrete footings should be at least 24 inches deep. Bolt all sections together, then measure diagonally from alternate door frames using a tape measure. With the cutoff piece, trace the remaining tails of the beams, and proceed to cut them out too. Damp soil conditions required the builders to fortify this post footing with extra gravel and concrete.
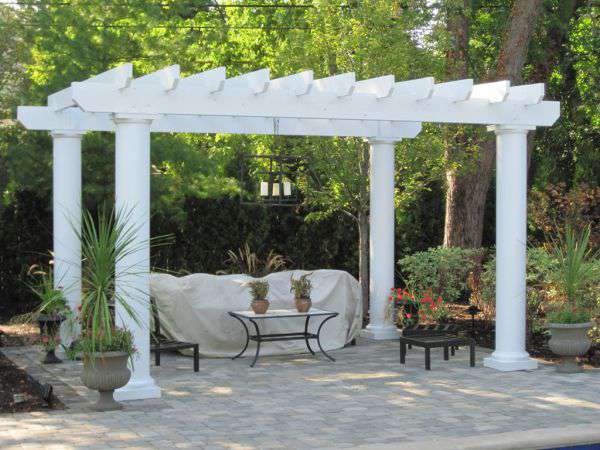
Pergolas can be built by using only a few basic materials, yet would offer a relaxing and shaded retreat that everyone will be able to enjoy for years to come. Work your way in each direction, and trim down the last skirt boards to fit flush with the posts. The longer soffit flap, intended to keep out bugs, attaches to the horizontal eave frame member with turnbuckle clips. This patio truly transformed the yard into an impressive area to entertain guests and to lay back and relax. Countersink the head of the screws for a professional result. Before you start laying planks down, you'll need to install your railing posts.
With one person on a ladder near the center, position and screw the remaining eaves in place. Lag shield anchors are larger than soft-metal shields and accept big lag screws for extra holding power for heavy objects. Note the reinforcing bar in the whole and the positioning of the column anchor. The sand has to be thoroughly dry to jiggle into the joints. Cutouts on the back of the trim allow it to fit over the column bases. Your existing architecture will have a lot to do with the size of your gazebo or patio cover. Use rafters ties to lock the beams into place.